
第21天-账号登录,社交登录,分布式Session
1.账号密码登录

1.1.后台接口实现
LoginController
/*** 用户登录:账号密码登录* @param vo* @return*/
@PostMapping("/login")
public String login(UserLoginVO vo, RedirectAttributes redirectAttributes,HttpSession session) {//调用远程接口R r = memberFeignService.login(vo);if (r.getCode() != 0) {Map errors = new HashMap<>();String msg = r.getData("msg", new TypeReference() {});errors.put("msg", msg);redirectAttributes.addFlashAttribute("errors", errors);//登录失败,重定向到登录页面return "redirect:http://auth.gmall.com/login.html";}//将用户信息放入到session中MemberVO memberVO = r.getData("data", new TypeReference() {});session.setAttribute(AuthConstant.SESSION_LOGIN_USER, memberVO);//登录成功,重定向到首页return "redirect:http://gmall.com";
}
1.2.远程接口实现
MemberController
/*** 会员登录* @param vo* @return*/
@PostMapping("/login")
public R login(@RequestBody MemberLoginVO vo){MemberEntity memberEntity = memberService.login(vo);if (memberEntity == null) {return R.error(BizCode.ACCOUNT_PASSWORD_EXCEPTION.getCode(),BizCode.ACCOUNT_PASSWORD_EXCEPTION.getMessage());}return R.ok().put("data", memberEntity);
}
MemberServiceImpl
/*** 会员登录* @param vo* @return*/
@Override
public MemberEntity login(MemberLoginVO vo) {String account = vo.getAccount();String password = vo.getPassword();//数据库查询密文密码MemberEntity entity = baseMapper.selectOne(new QueryWrapper().eq("username",account).or().eq("mobile", account));if (entity != null) {//密文String passwordDb = entity.getPassword();	//密码匹配BCryptPasswordEncoder passwordEncoder = new BCryptPasswordEncoder();boolean matches = passwordEncoder.matches(password, passwordDb);if (matches) {return entity;} else {return null;}}return null;
}
2.社交登录
2.1.简介
QQ、微博、微信、GitHub等网站的的用户量非常大,别的网站为了简化自我网站的登录与注册逻辑,就会引入社交登录功能。
2.2.引入步骤
以QQ为例,接入QQ登录步骤如下:
- 用户点击QQ按钮
- 引导跳转到QQ授权页
- 用户主动点击授权,跳回之前的网页
2.3.OAuth2.0
OAuth(开发授权)是一个开发标准,允许用户授权第三方网站访问他们存储在另外的服务提供者上的信息,而不需要将用户名和密码提供给第三方网站或分享他们数据的所有内容。
OAuth2.0较1.0相比,整个授权验证流程更简单更安全,也是未来最主要的用户身份验证和授权方式。对于用户相关的 OpenAPI(例如获取用户信息,动态同步,照片,日志,分享等),为了保护用户数据的安全和隐私,第三方网站访问用户数据前都需要显示的向用户征求授权。
授权流程:
- 向用户申请授权请求认证
- 用户授权(输入自己的社交账号密码登录)
- 使用上步授权,进行认证
- 认证通过,返回访问令牌
- 使用访问令牌,获取开放的保护信息(用户信息)
- 认证令牌,返回受保护信息
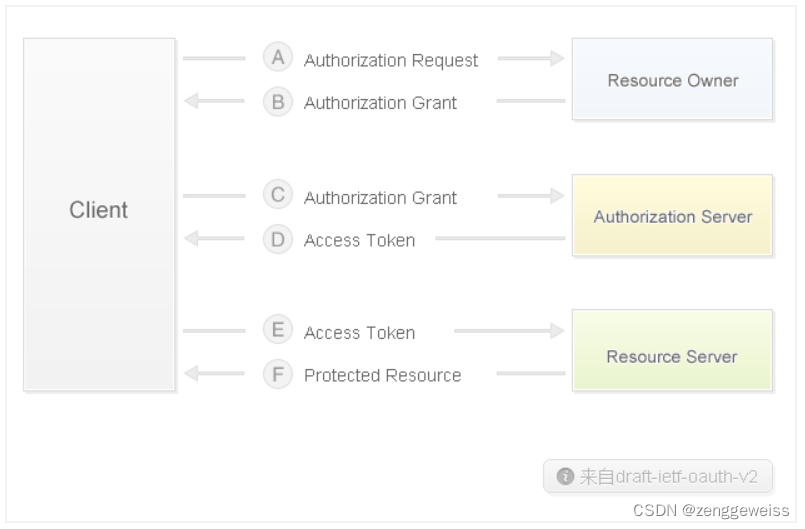
- Client 指第三方应用(我们自己的网站)
- Resource Owner 指用户
- Authorization Server 是社交应用的授权服务器(QQ、微博、微信等)
- Resource Server 是API服务器
2.4.微博登录
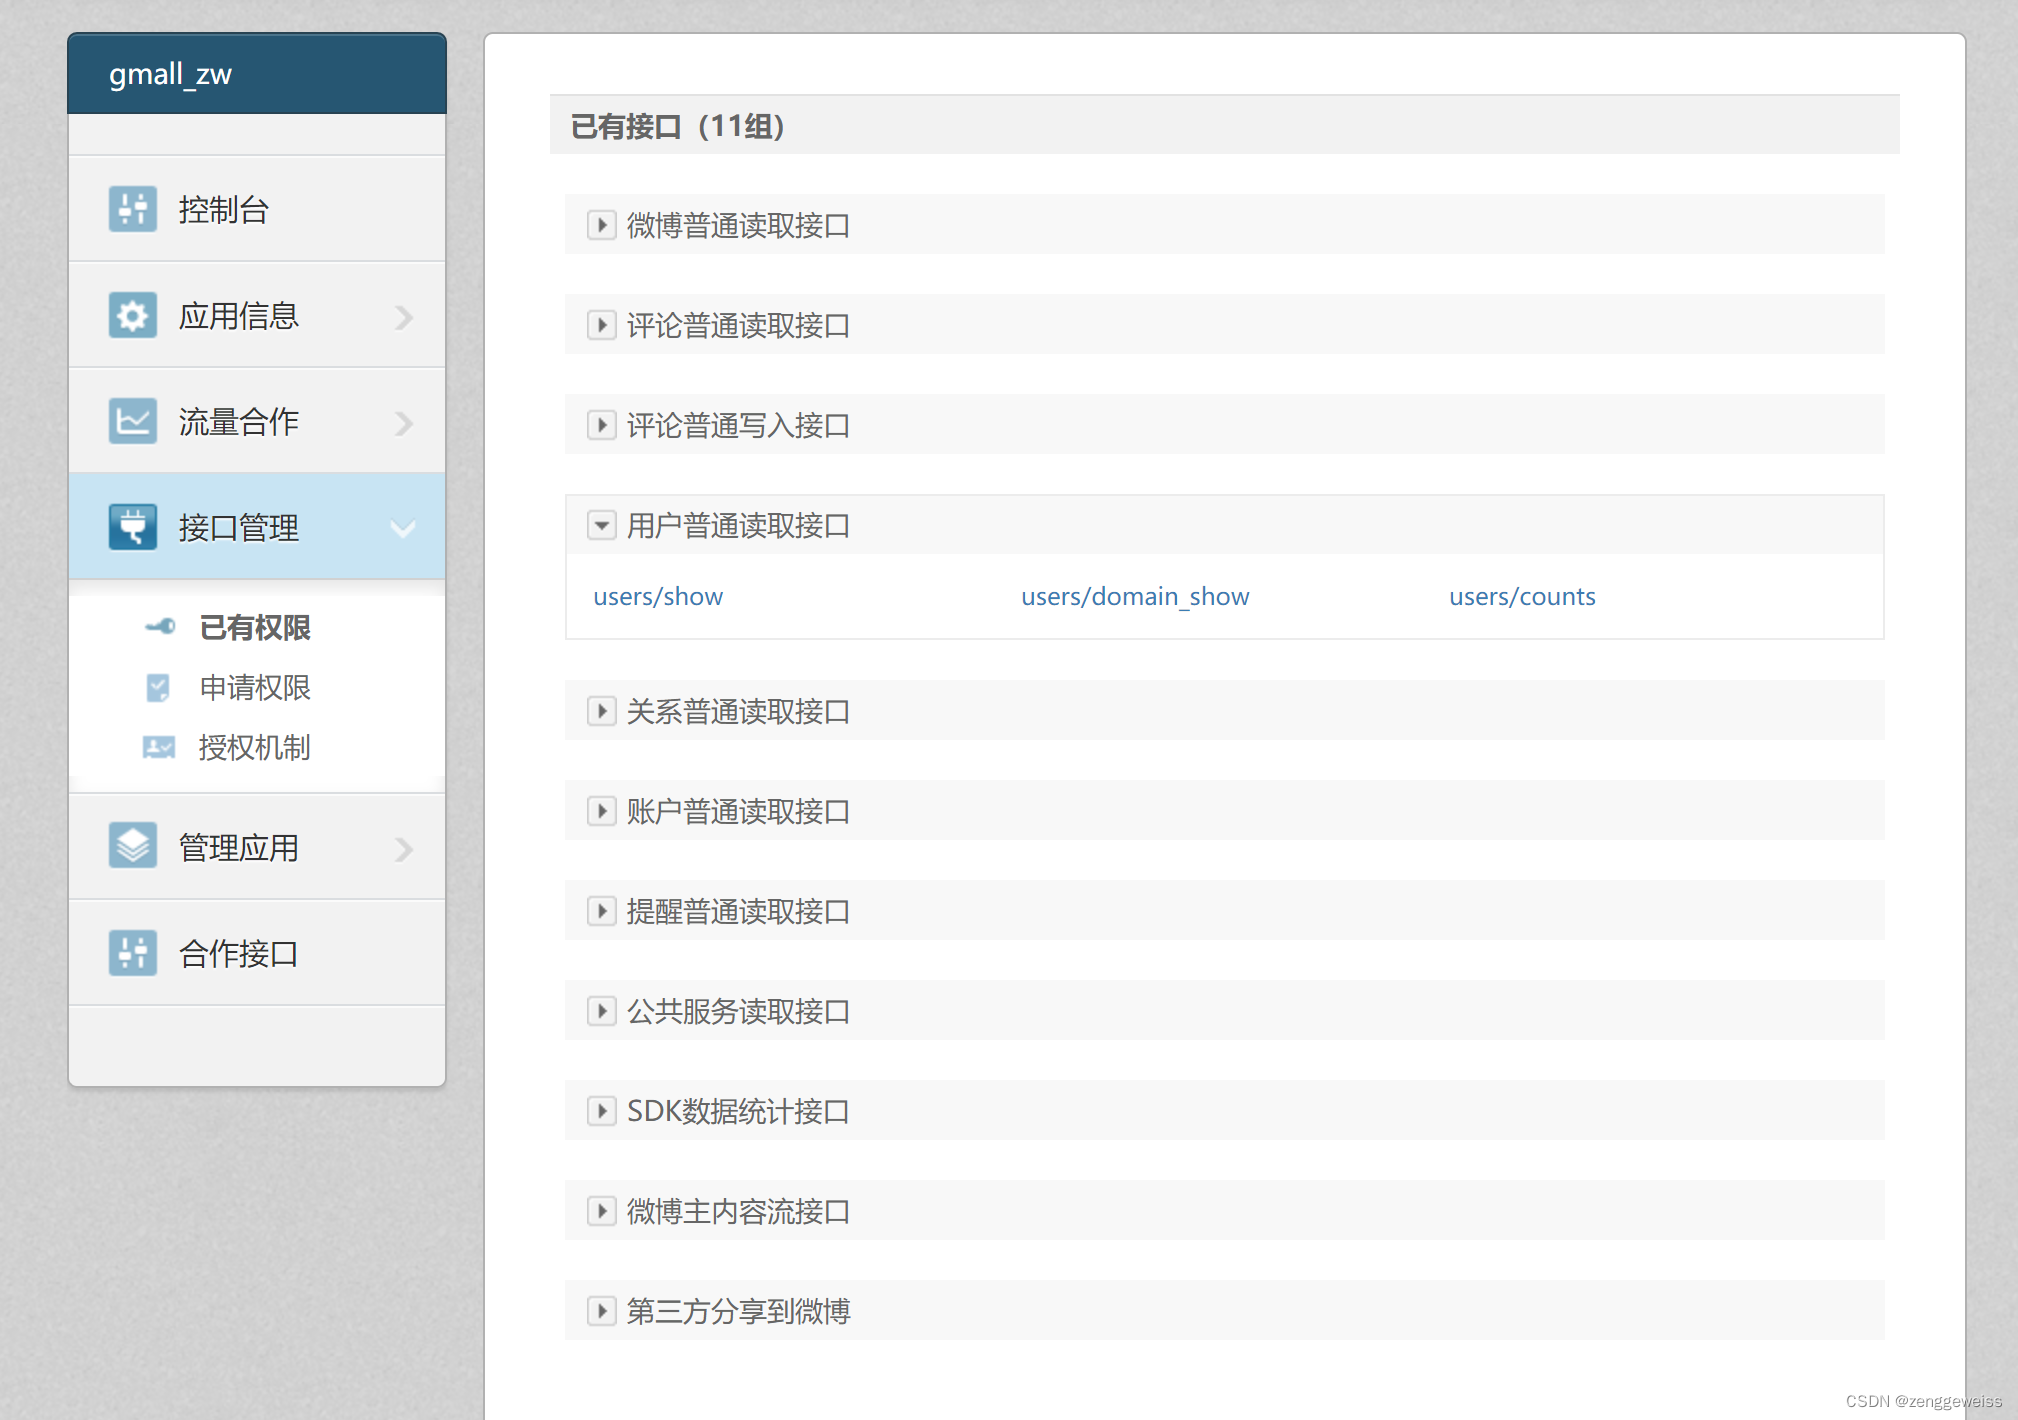
2.4.1.进入微博开放平台
微博开放平台:https://open.weibo.com
注册并完善开发者信息和开发者认证,等待审核通过(1-3天时间)。
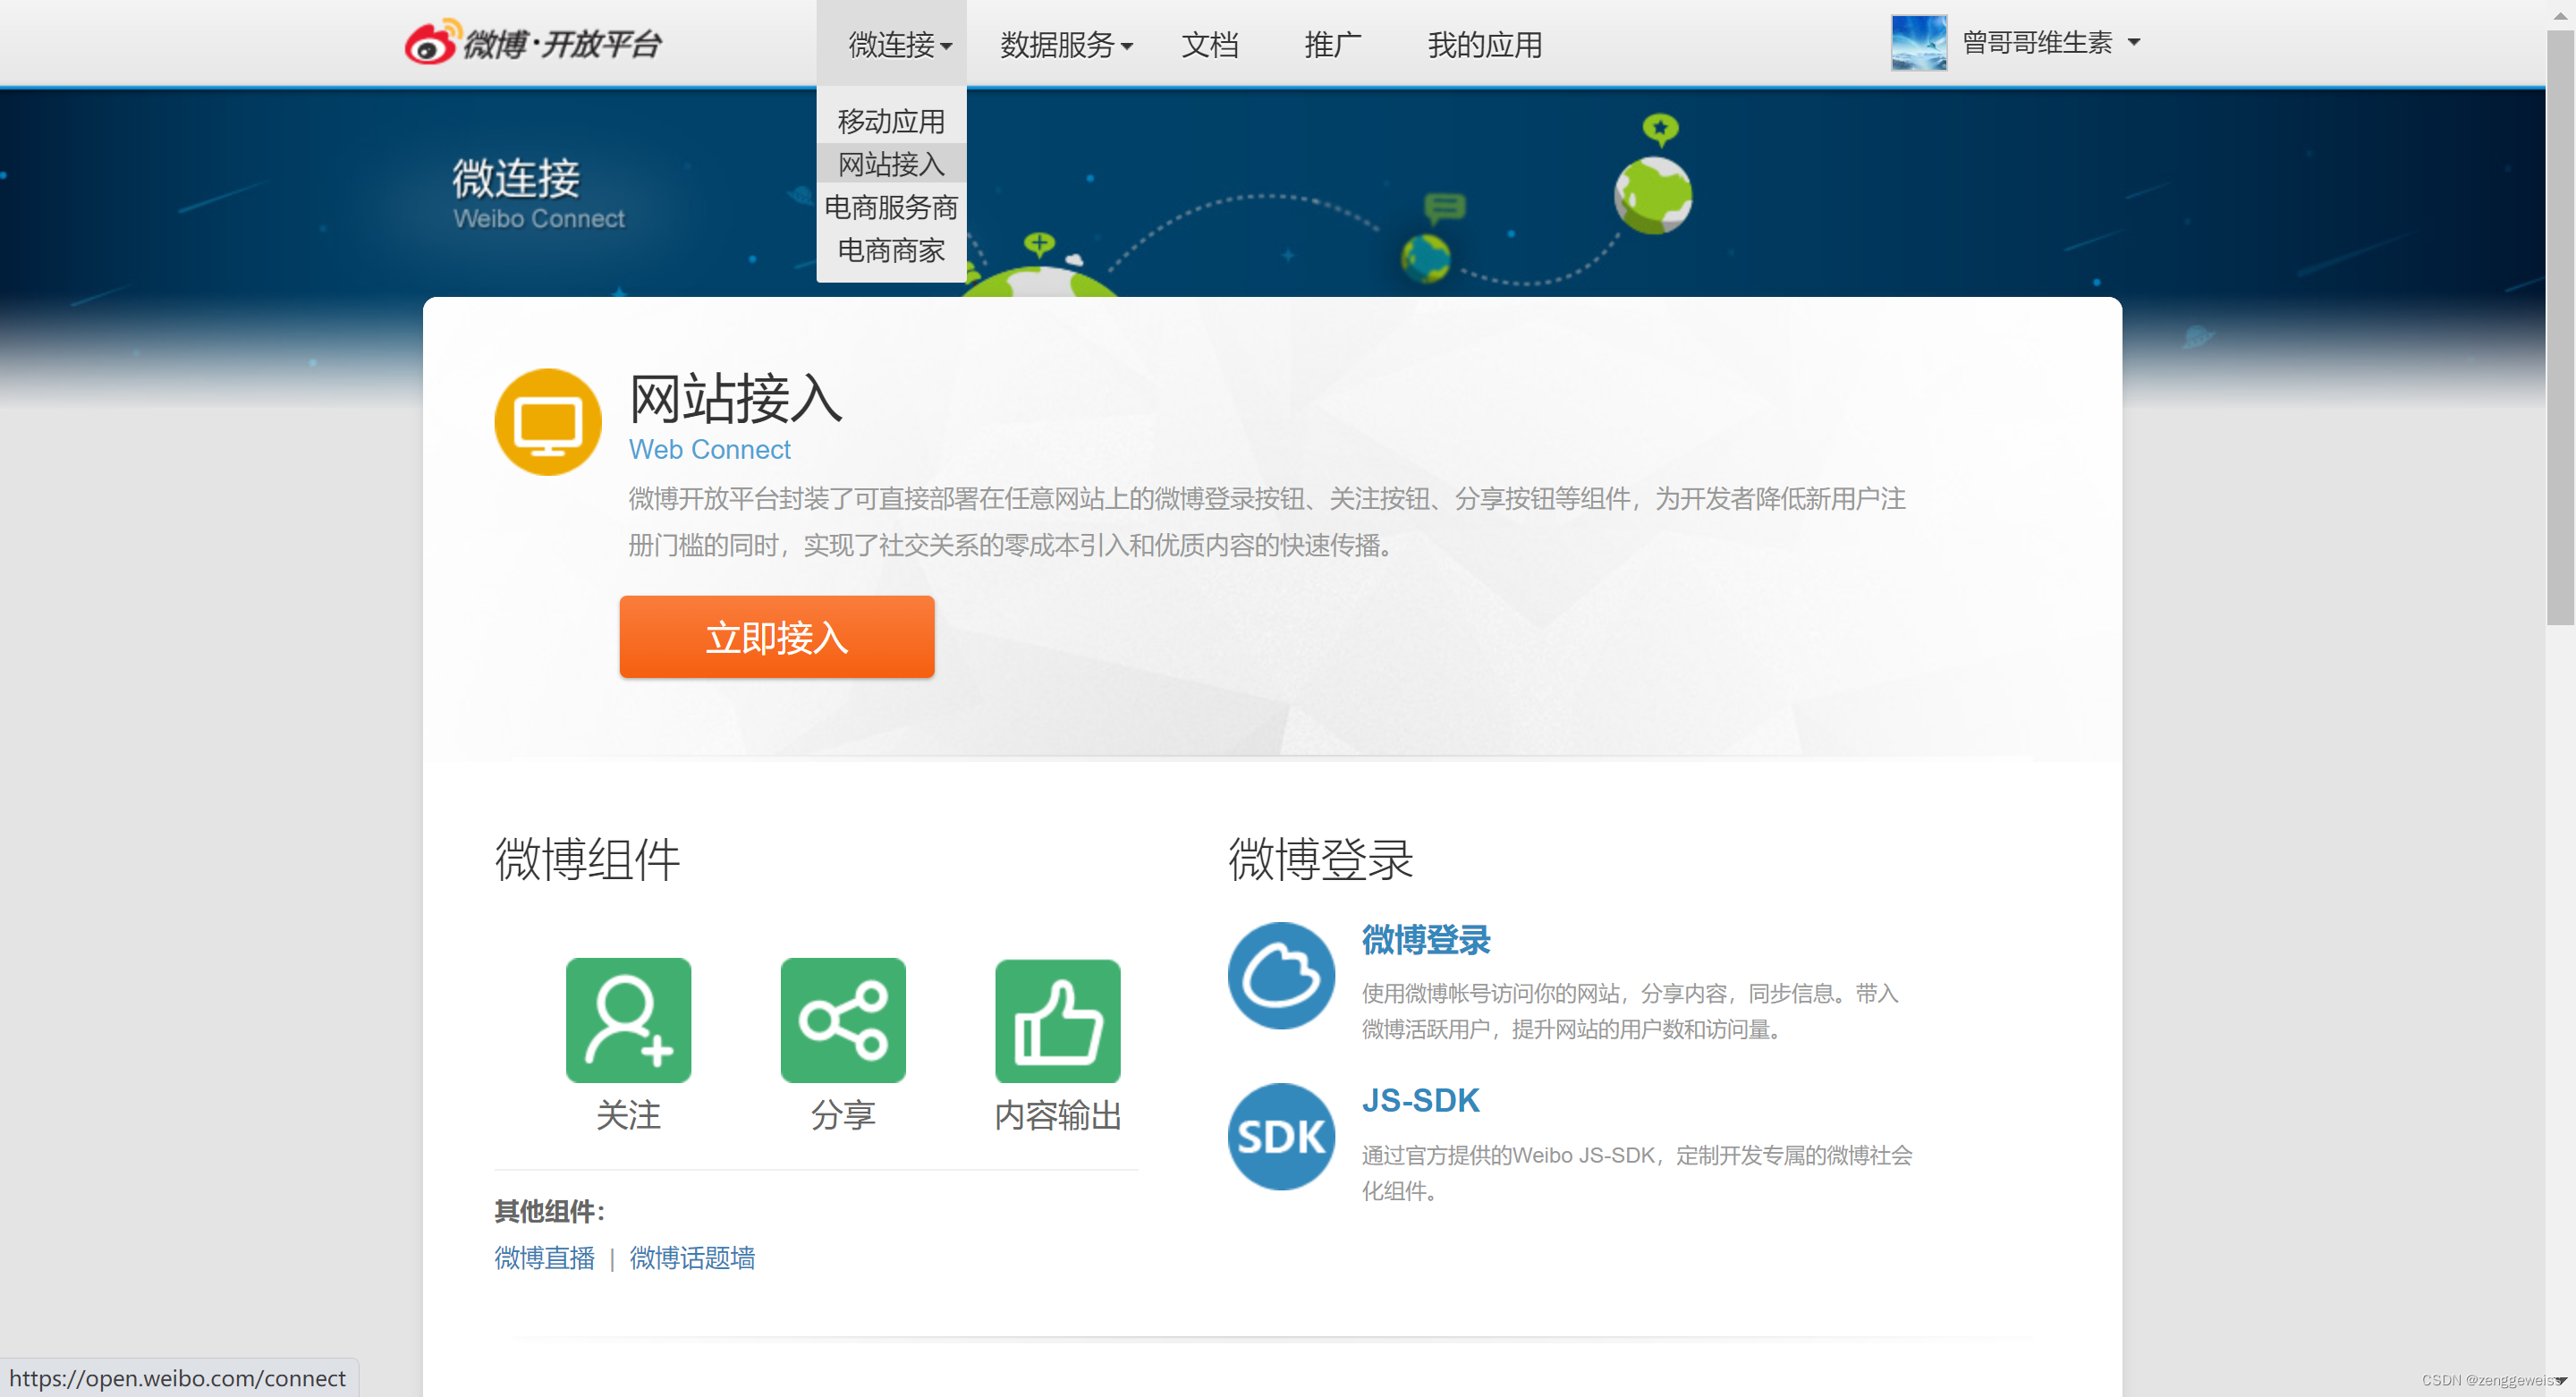
2.4.2.登录微博,进入微连接
点击 立即接入 ,开始创建应用
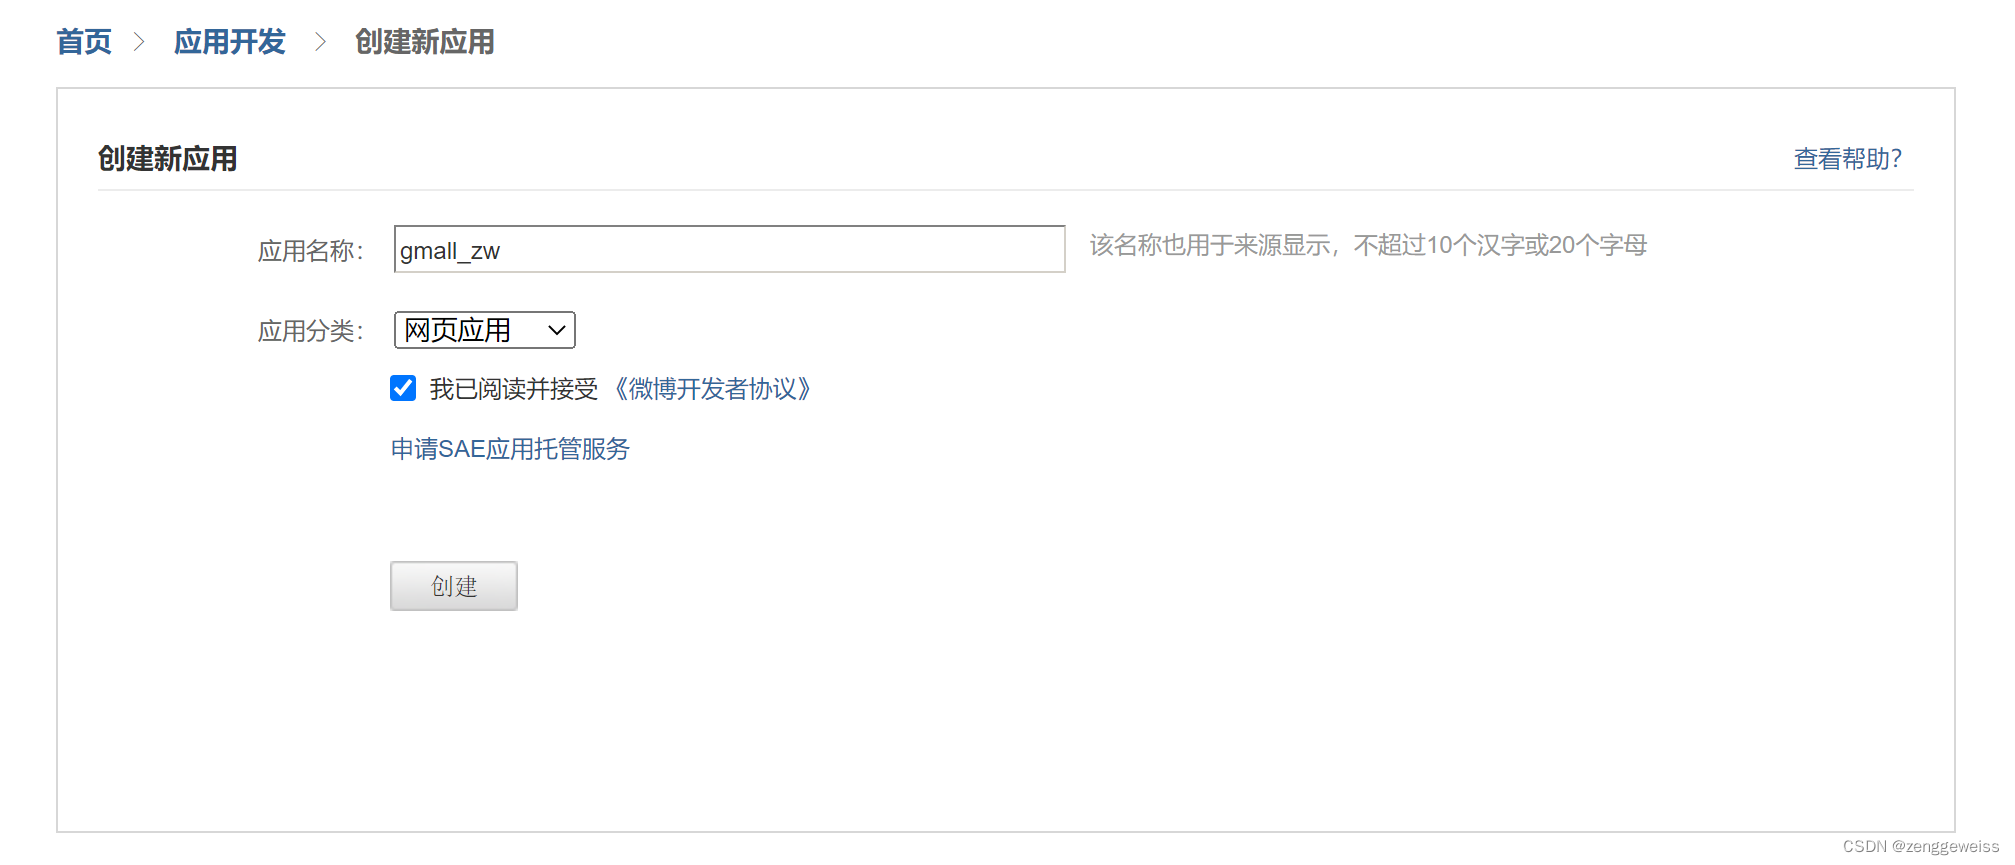
2.4.3.创建应用
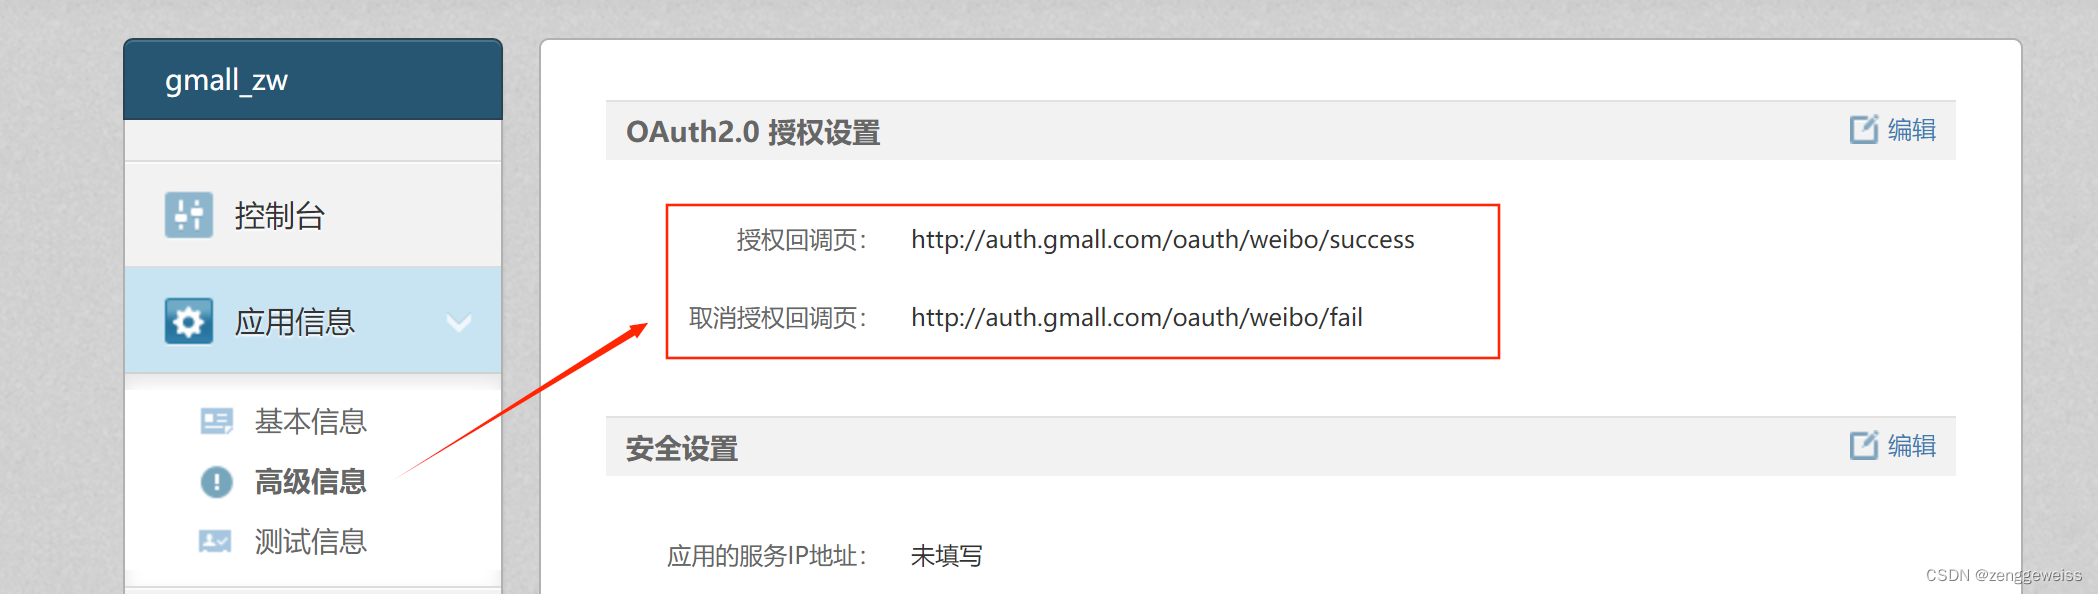
2.4.4.OAuth2.0设置
2.4.5.微博授权步骤
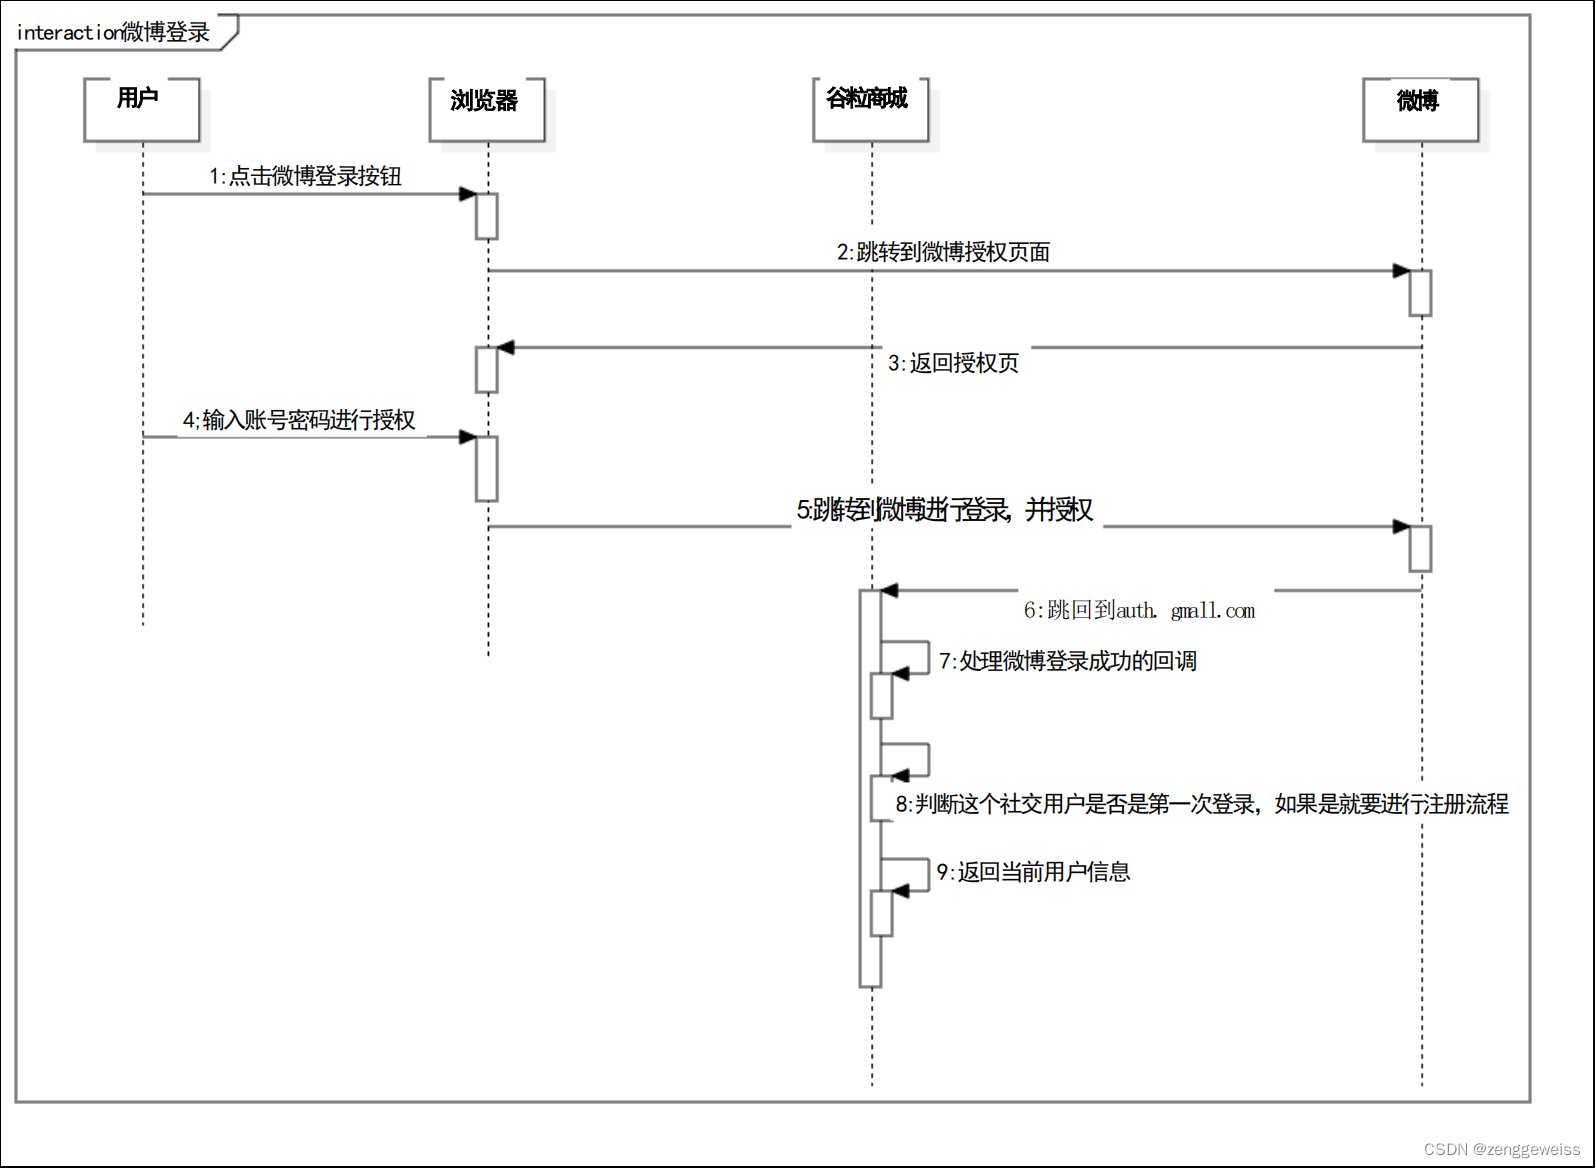
核心:使用code换取access_token
1)引导用户到授权页登录
API文档:https://open.weibo.com/wiki/Oauth2/authorize
GET
https://api.weibo.com/oauth2/authorize?client_id=YOUR_CLIENT_ID&response_type=code&redirect_uri=YOUR_REGISTERED_REDIRECT_URI
- client_id:应用的 App Key
- redirect_uri:成功的回调地址
2)用户登录,并同意授权
输入社交账号和密码,进行登录,登录成功后,点击授权
返回 code,通过code来换取 Access Token
http://auth.gmall.com/oauth/weibo/success?code=XXX
3)使用code换取Access Token
API文档:https://open.weibo.com/wiki/Oauth2/access_token
POST
https://api.weibo.com/oauth2/access_token?
client_id=YOUR_CLIENT_ID&client_secret=YOUR_CLIENT_SECRET&grant_type=authorization_code&redirect_uri=YOUR_REGISTERED_REDIRECT_URI&code=CODE
- client_id:应用的 App Key
- client_secret:应用的 App Secret
- grant_type:authorization_code
- redirect_uri:成功的回调地址
- code:同意授权后,返回的code
返回值:
- access_token
- uid
- expires_in
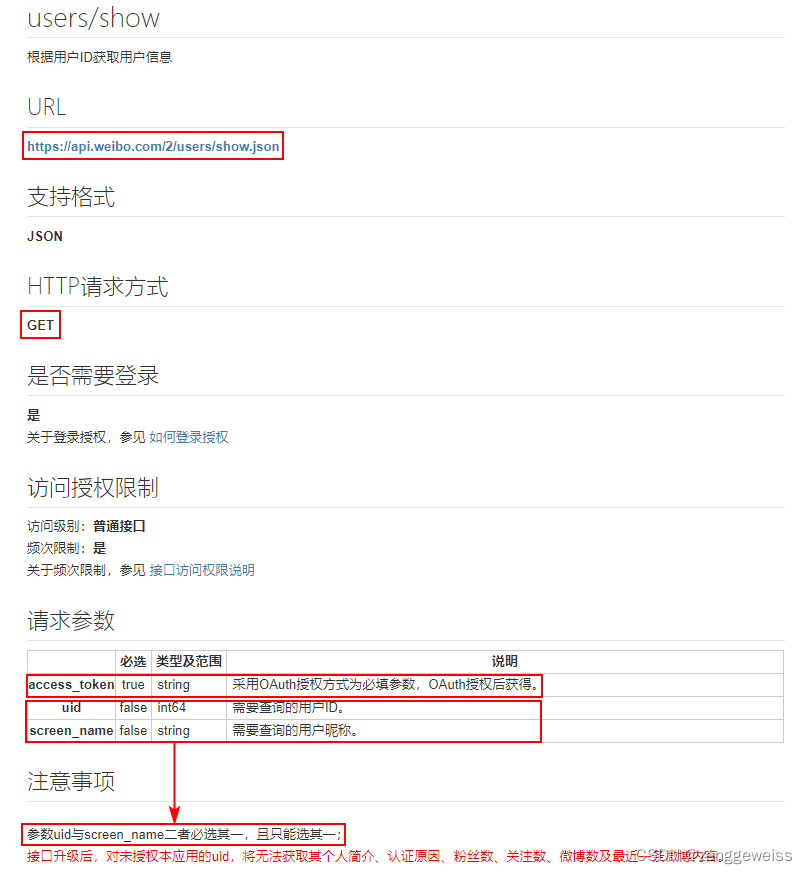
4)使用获得的Access Token调用API
获取用户信息接口API描述:
2.5.整合微博登录
2.5.1.引导登录授权
2.5.2.回调处理
OAuth2Controller
package com.atguigu.gmall.auth.controller;import com.fasterxml.jackson.core.type.TypeReference;
import com.atguigu.common.constant.AuthConstant;
import com.atguigu.common.utils.HttpUtils;
import com.atguigu.common.utils.JsonUtils;
import com.atguigu.common.utils.R;
import com.atguigu.common.vo.MemberVO;
import com.atguigu.gmall.auth.feign.MemberFeignService;
import com.atguigu.gmall.auth.vo.WeiboUser;
import org.apache.http.HttpResponse;
import org.apache.http.util.EntityUtils;
import org.springframework.beans.factory.annotation.Autowired;
import org.springframework.stereotype.Controller;
import org.springframework.web.bind.annotation.GetMapping;
import org.springframework.web.bind.annotation.RequestParam;import javax.servlet.http.HttpSession;
import java.util.HashMap;
import java.util.Map;/*** 社交登录 {@link OAuth2Controller}** @author zhangwen* @email: 1466787185@qq.com*/
@Controller
public class OAuth2Controller {@Autowiredprivate MemberFeignService memberFeignService;/*** 微博登录* @param code* @param session* @return*/@GetMapping("/oauth/weibo/success")public String weibo(@RequestParam("code") String code, HttpSession session) {Map body = new HashMap<>();body.put("client_id", "2605963680");body.put("client_secret", "6758915013e266ee3c0c90f839c4b472");body.put("grant_type", "authorization_code");body.put("redirect_uri", "http://auth.gmall.com/oauth/weibo/success");body.put("code", code);try {// 根据code换取access_tokenHttpResponse response = HttpUtils.doPost("https://api.weibo.com", "/oauth2/access_token", "post",new HashMap(), null, body);// 处理响应if (response.getStatusLine().getStatusCode() == 200) {// 获取到access_tokenString json = EntityUtils.toString(response.getEntity());WeiboUser weiboUser = JsonUtils.jsonToPojo(json, WeiboUser.class);// 登录或者注册// 当前用户第一次登录网站,自动注册,为当前用户生成一个会员信息账号R r = memberFeignService.weiboLogin(weiboUser);MemberVO memberVO = r.getData("data", new TypeReference() {});session.setAttribute(AuthConstant.SESSION_LOGIN_USER, memberVO);// 登录成功重定向到首页return "redirect:http://gmall.com";} else {return "redirect:http://auth.gmall.com/login.html";}} catch (Exception e) {e.printStackTrace();}return null;}
}
2.5.3.会员接口实现
MemberController
/*** 微博登录* @param weiboUser* @return*/
@PostMapping("/oauth/weibo/login")
public R weiboLogin(@RequestBody WeiboUser weiboUser){MemberEntity memberEntity = memberService.login(weiboUser);if (memberEntity == null) {return R.error(BizCode.ACCOUNT_PASSWORD_EXCEPTION.getCode(),BizCode.ACCOUNT_PASSWORD_EXCEPTION.getMessage());}return R.ok().put("data", memberEntity);
}
MemberServiceImpl
/*** 微博登录* @param weiboUser* @return*/@Overridepublic MemberEntity login(WeiboUser weiboUser) {// 登录和注册合并逻辑// 判断当前微博用户是否已经登录过MemberEntity memberEntity = baseMapper.selectOne(new QueryWrapper().eq("weibo_uid", weiboUser.getUid()));if (memberEntity != null) {// 用户已经注册,更新access_token和expires_inMemberEntity updateEntity = new MemberEntity();updateEntity.setId(memberEntity.getId());updateEntity.setAccessToken(weiboUser.getAccess_token());updateEntity.setExpiresIn(weiboUser.getExpires_in());baseMapper.updateById(updateEntity);memberEntity.setAccessToken(weiboUser.getAccess_token());memberEntity.setExpiresIn(weiboUser.getExpires_in());return memberEntity;} else {// 没有查到微博用户,则需要注册MemberEntity regEntity = new MemberEntity();// 查询当前微博用户的社交账号信息(昵称,性别等)Map querys = new HashMap<>(2);querys.put("access_token", weiboUser.getAccess_token());querys.put("uid", weiboUser.getUid());try {HttpResponse response = HttpUtils.doGet("https://api.weibo.com", "/2/users/show.json","get", new HashMap(0), querys);if (response.getStatusLine().getStatusCode() == 200) {String json = EntityUtils.toString(response.getEntity());Map map = JsonUtils.jsonToObject(json, new TypeReference 3.分布式Session
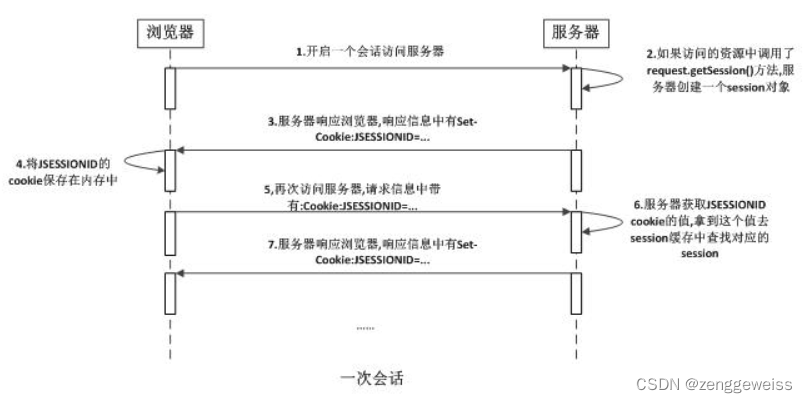
3.1.Session原理
3.2.分布式环境下Session共享问题
3.2.1.Session复制
同一个服务(同域名),复制多份,Session不同步问题。
3.2.2.Session共享
不同服务(不同域名),Session不能共享问题。
3.2.3.Session共享问题解决方案
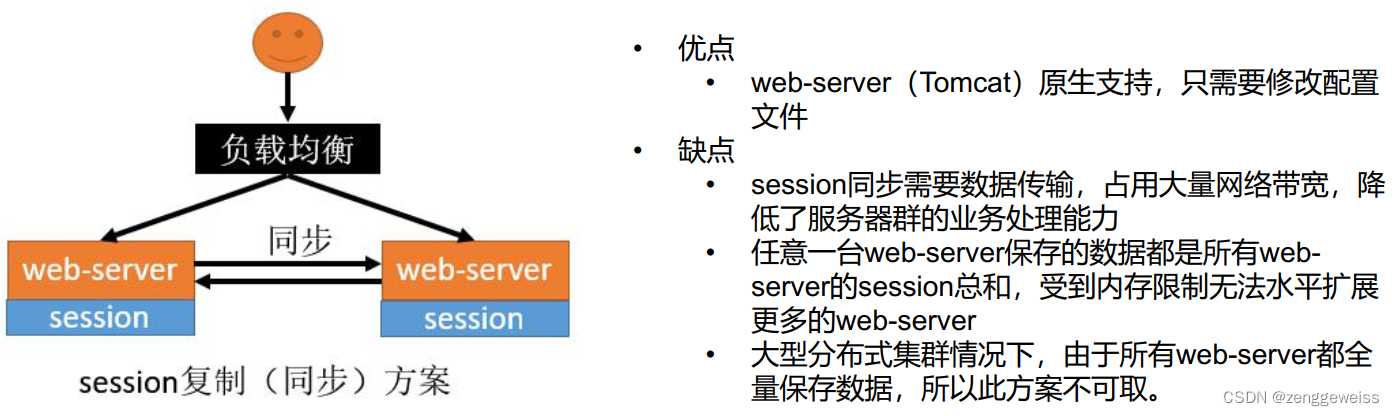
- Session复制
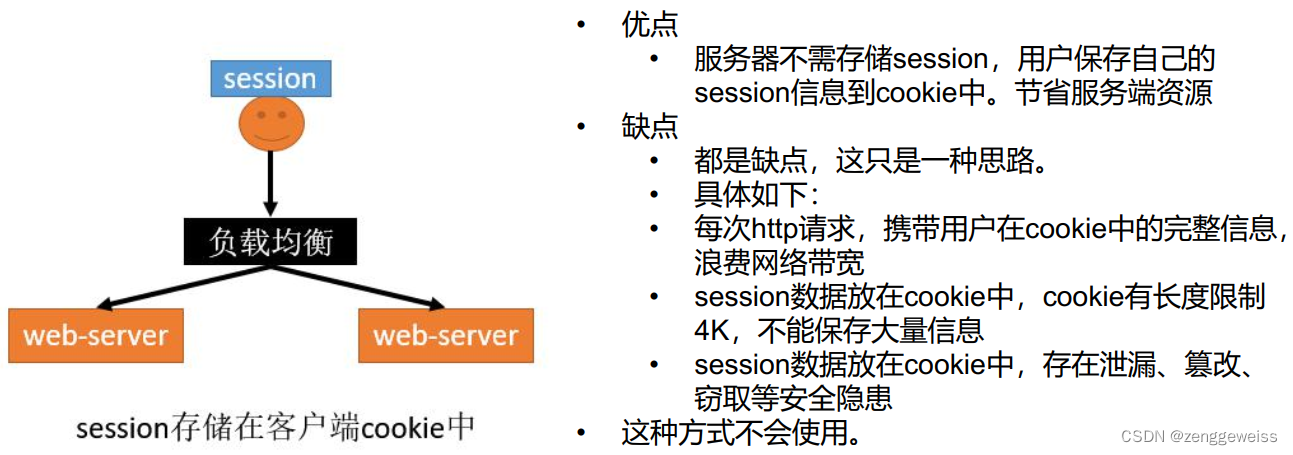
- 客户端存储
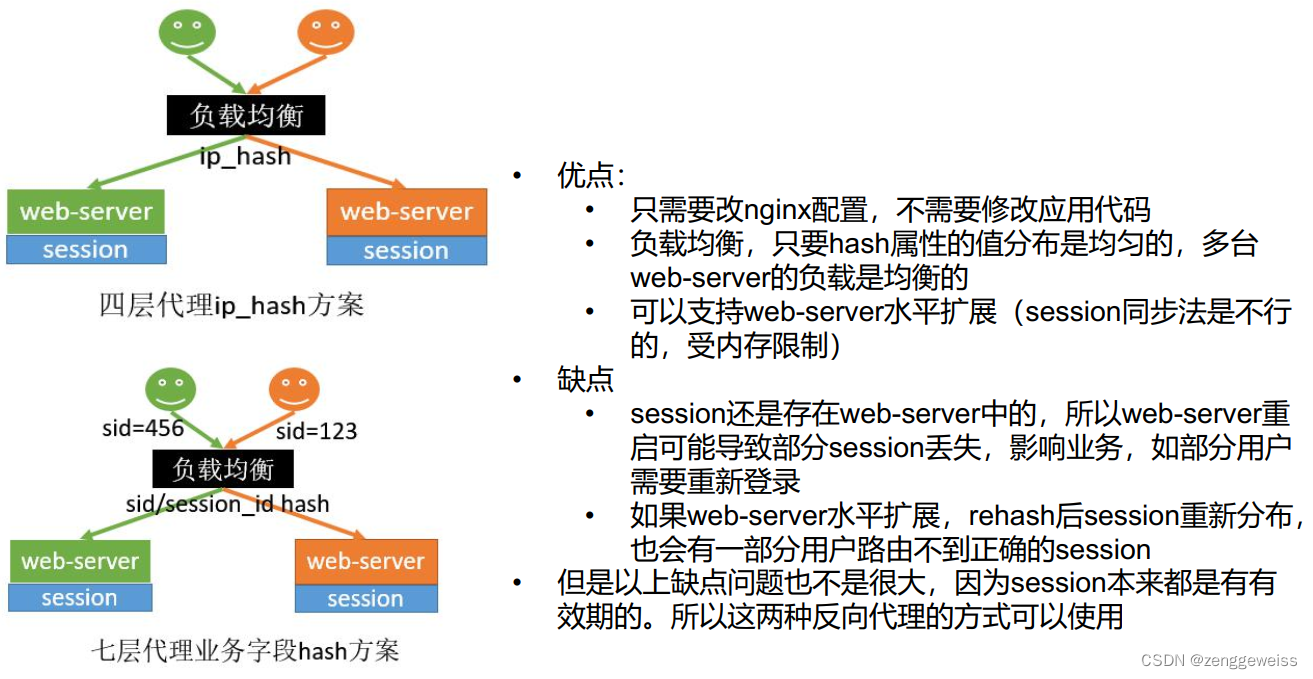
- Hash一致性
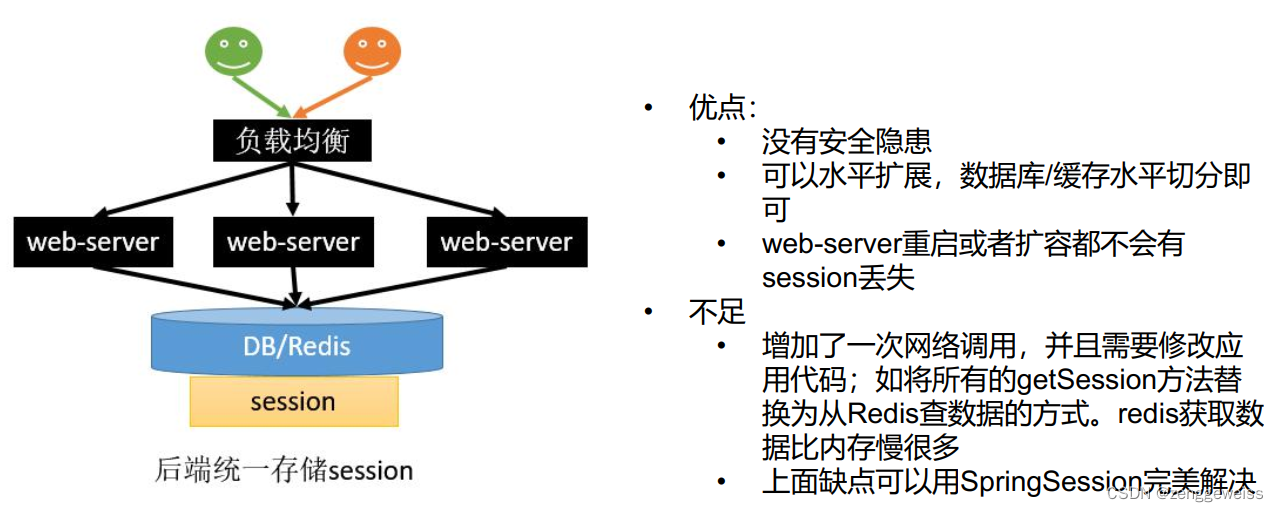
- 统一存储
Session复制
客户端存储
Hash一致性
统一存储
3.3.整合SpringSession
3.3.1.介绍
官方文档:https://docs.spring.io/spring-session/docs/2.3.2.RELEASE/reference/html5/
3.3.2.导入依赖
org.springframework.session spring-session-data-redis
3.3.3.Spring Boot配置
spring.session.store-type=redis # Session store type.
server.servlet.session.timeout=30m # Session timeout. If a duration suffix is not specified, seconds is used.
spring.session.redis.flush-mode=on_save # Sessions flush mode.
spring.session.redis.namespace=spring:session # Namespace for keys used to store sessions.
spring.redis.host=localhost # Redis server host.
spring.redis.password= # Login password of the redis server.
spring.redis.port=6379 # Redis server port.
3.3.4.开启SpringSession功能
主启动类上使用 @EnableRedisHttpSession 注解开启 SpringSession
@EnableRedisHttpSession
@SpringBootApplication
public class GmallAuthApplication {public static void main(String[] args) {SpringApplication.run(GmallAuthApplication.class, args);}
}
3.3.5.SpringSession配置类
-
使用JSON序列化方式来序列化对象存储到Redis
默认使用JDK序列化机制,Java类需要实现序列化接口 Serializable
-
解决子域Session共享,Cookie令牌统一分配到父域
默认发的令牌是当前作用域
package com.atguigu.gmall.auth.config;import org.springframework.context.annotation.Bean;
import org.springframework.context.annotation.Configuration;
import org.springframework.data.redis.serializer.GenericJackson2JsonRedisSerializer;
import org.springframework.data.redis.serializer.RedisSerializer;
import org.springframework.session.web.http.CookieSerializer;
import org.springframework.session.web.http.DefaultCookieSerializer;/*** Spring Session 配置类 {@link SessionConfig}** @author zhangwen* @email: 1466787185@qq.com*/
@Configuration
public class SessionConfig {/*** 序列化JSON存储* @return*/@Beanpublic RedisSerializer3.3.6.登录测试
gmall-product 商城 index 和 item 修改登录显示逻辑,从session中获取登录用户名
欢迎,[[${session.loginUser.nickname}]]你好,请登录

免费注册
1)登录成功,显示用户昵称

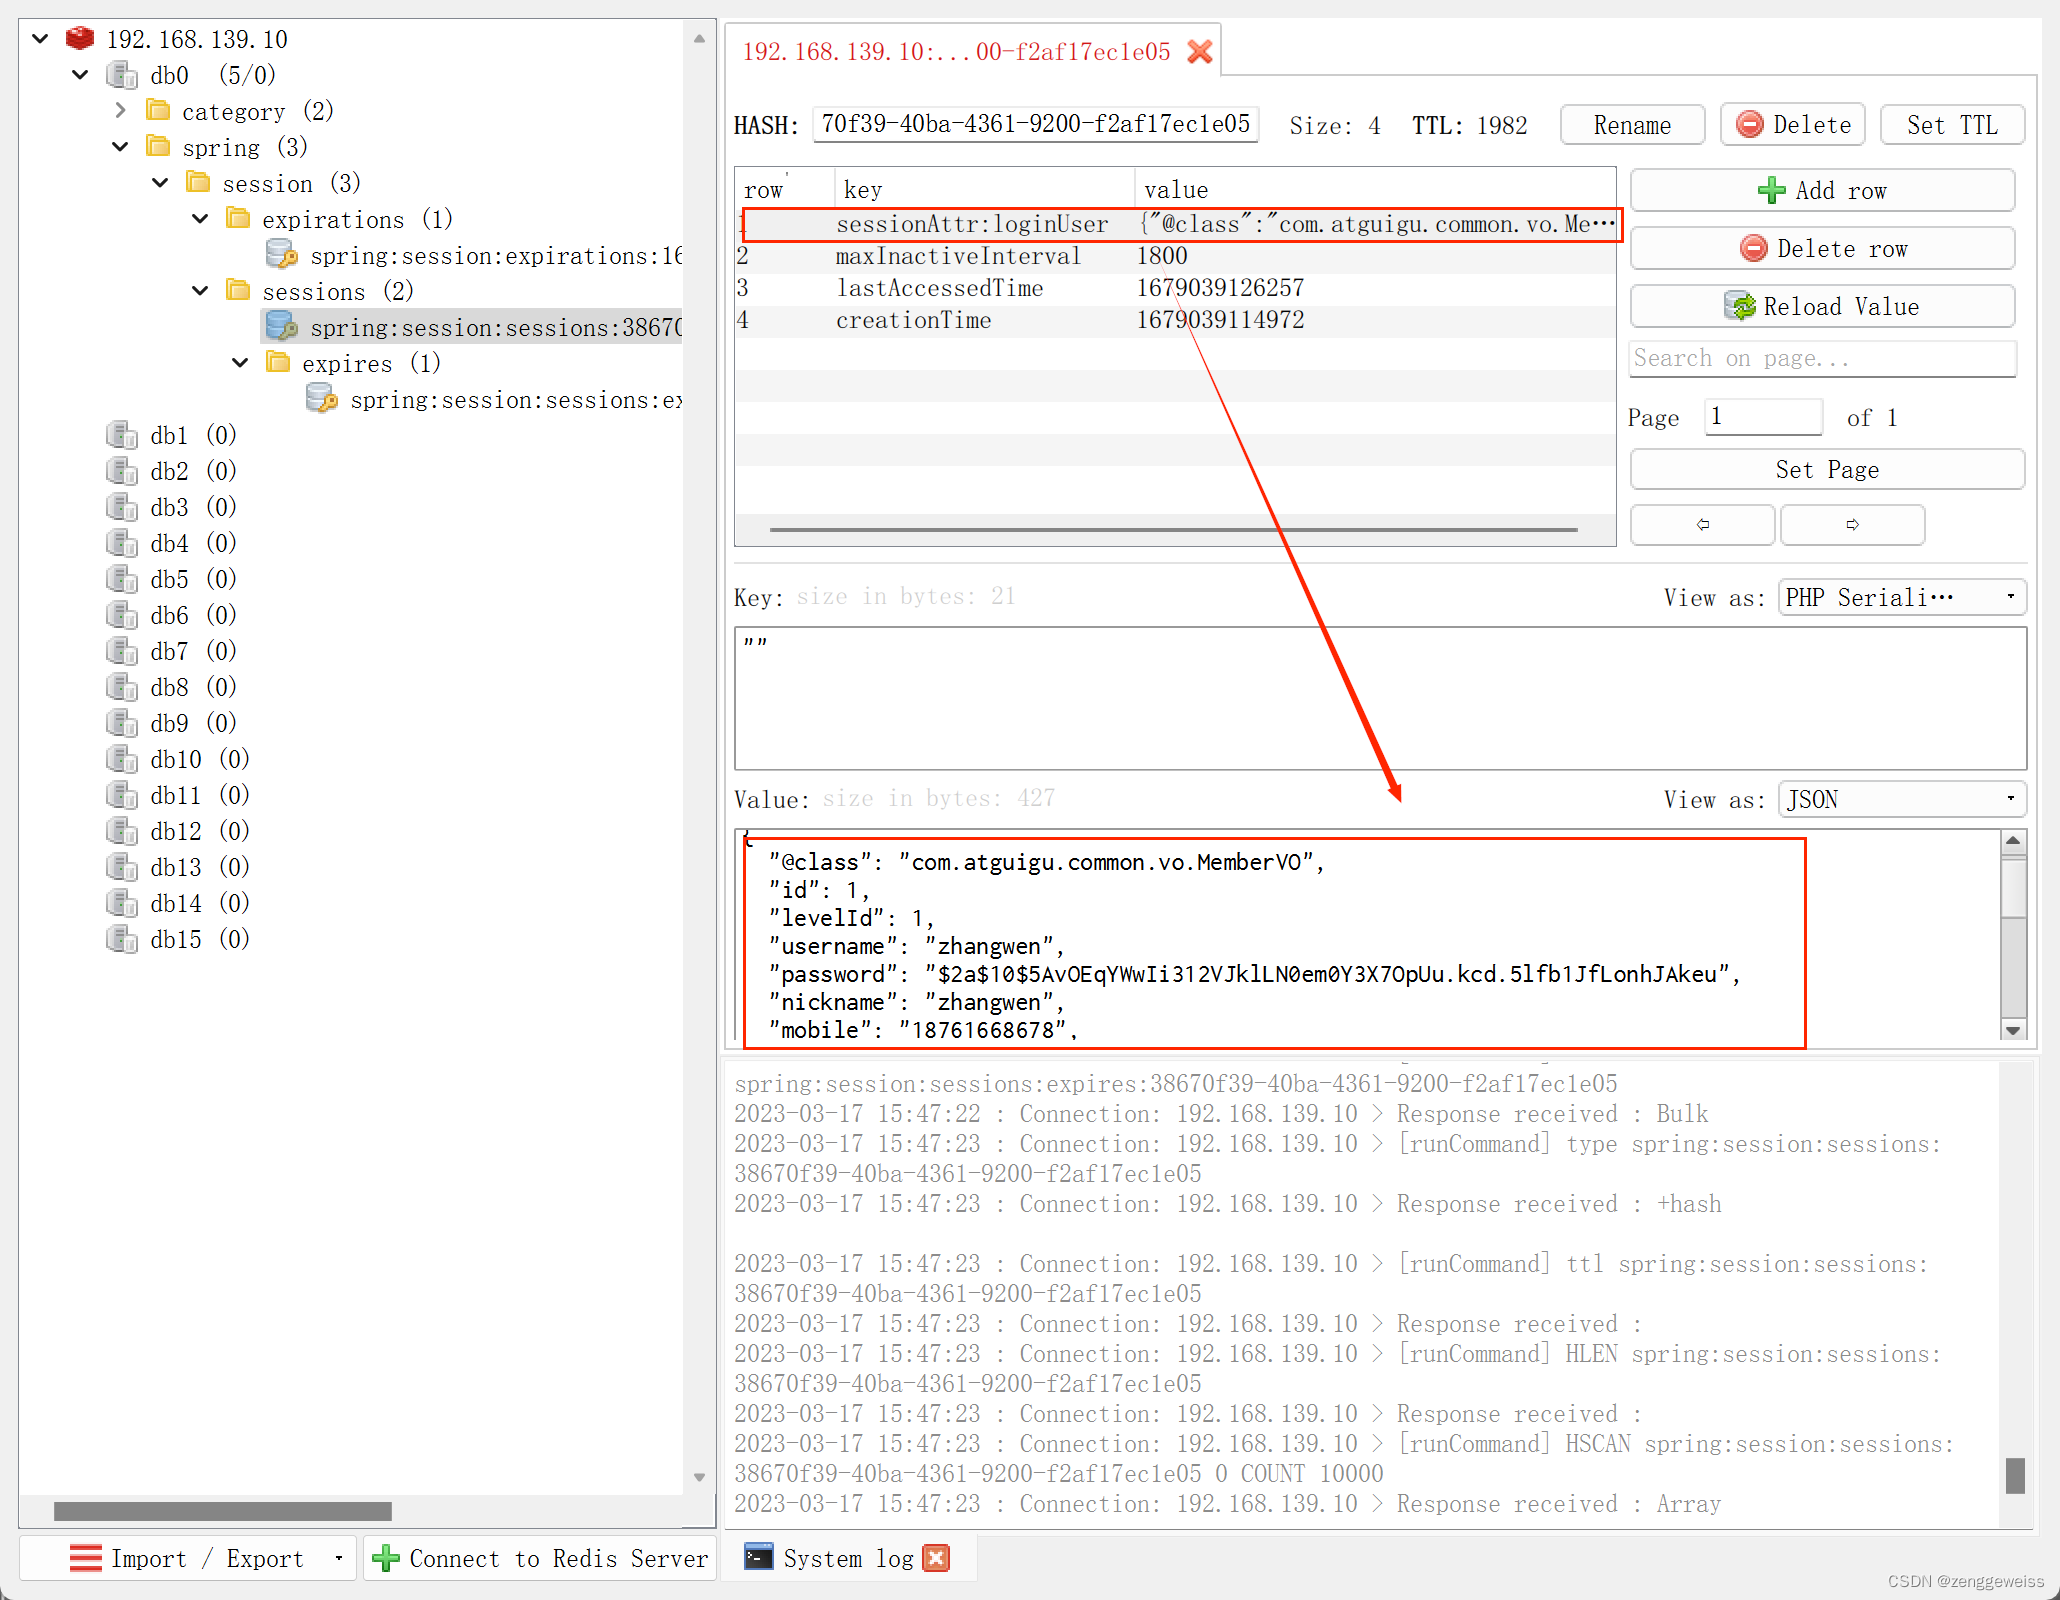
2)Redis中存储用户信息
3.3.7.Spring Session核心原理
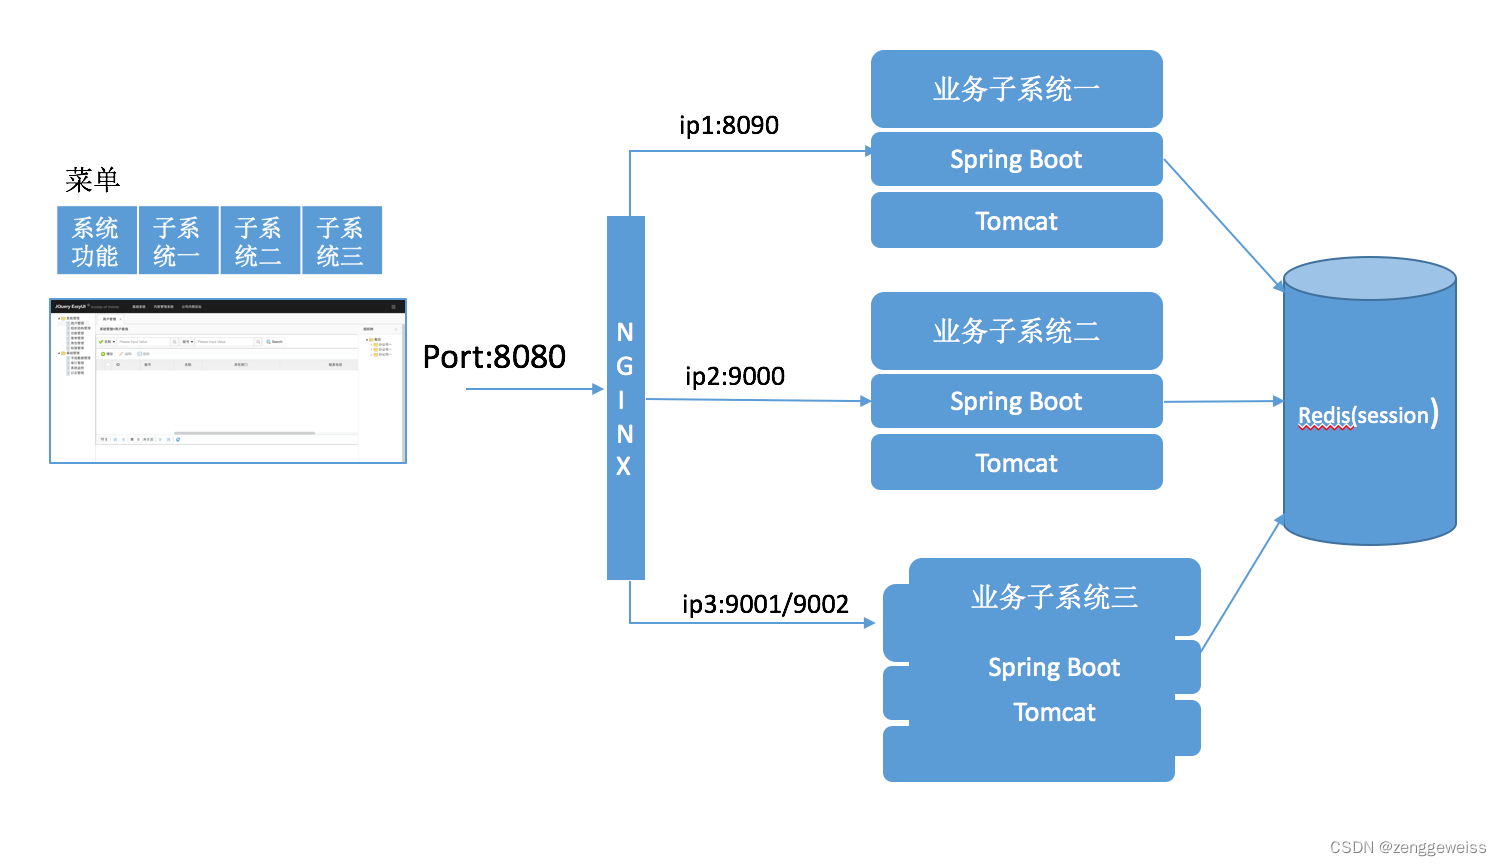
业务子系统三这种部署方式为水平扩展,前端通过Nginx提供反向代理,会话管理可以通过SpringSession,使用Redis来存放Session。部署Spring Boot应用到任意一台Web服务器上,从而提高了系统可靠性和可伸缩性。
核心源码分析:
public class SessionRepositoryFilter extends OncePerRequestFilter {@Overrideprotected void doFilterInternal(HttpServletRequest request,HttpServletResponse response, FilterChain filterChain)throws ServletException, IOException {//把session操作类放入到当前请求中request.setAttribute(SESSION_REPOSITORY_ATTR, this.sessionRepository);//对原始的request和response进行包装SessionRepositoryRequestWrapper wrappedRequest = new SessionRepositoryRequestWrapper(request, response);SessionRepositoryResponseWrapper wrappedResponse = new SessionRepositoryResponseWrapper(wrappedRequest,response);try {//包装后的对象应用到了后面的整个执行链filterChain.doFilter(wrappedRequest, wrappedResponse);}finally {wrappedRequest.commitSession();}}
}
-
@EnableRedisHttpSession 导入 RedisHttpSessionConfiguration 配置
给容器中添加了一个组件 RedisIndexedSessionRepository :Redis操作session增删改查的封装类继承 SpringHttpSessionConfiguration :给容器中添加了
SessionRepositoryFilter Session存储过滤器,每个请求过来都必须经过Filter -
SessionRepositoryFilter
创建的时候,就自动从容器中获取到了 sessionRepository原始的 request、response都被包装
以后获取session,都要通过原始request.getSession()获取
wrappedRequest 重写了 getSession() 方法,从 SessionRepository 中获取
Session(RedisSession) -
Filter + 装饰者模式
3.3.8.用户登录逻辑优化
/*** 登录页面* @param session* @return*/
@GetMapping("/login.html")
public String loginPage(HttpSession session) {Object attribute = session.getAttribute(AuthConstant.SESSION_LOGIN_USER);if (attribute!=null) {//用户登录了,跳转到首页return "redirect:http://gmall.com";}return "login";
}
3.3.9.检索页面登录逻辑完善
检索服务 gmall-search
- 引入Spring Session 和 Redis 相关依赖包
- 主启动类上使用 @EnableRedisHttpSession 注解开启 SpringSession
- 编写Spring Session配置类
- 修改 list 页面登录逻辑,从 Session 中获取用户昵称