
Point Pair Feature 原理及代码详解 OpenCV-PCL详解系列(一、原理解析)
Model Globally, Match Locally: Efficient and Robust 3D Object Recognition
全局建模,局部匹配:高效鲁棒的三维物体识别
省略介绍及相关叙述,直奔主题。
目标工作:点云目标识别,在给定场景中识别到模型点云
方法:采用PointPairFeature(点对特征)进行特征描述,采用投票思想确定物体位姿,运用聚类及平均值的方式来消减误差
PointPairFeature点对特征原理:
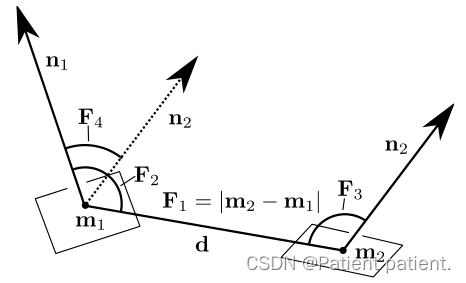
点对特征相对好理解,对于含有N个点的Model表面任意的点对(mi,mj),(i=1...n...N,j=1...n...N)\left(\mathbf{m}_i, \mathbf{m}_j\right),\left(\mathbf{i}=1...n...N, \mathbf{j}=1...n...N\right)(mi,mj),(i=1...n...N,j=1...n...N),共计N∗(N−1)N*(N-1)N∗(N−1)个点对。以Model上的一点对(m1,m2)\left(\mathbf{m}_1, \mathbf{m}_2\right)(m1,m2),其PPF特征可由下公式表示:
F(m1,m2)=(∥d∥2,∠(n1,d),∠(n2,d),∠(n1,n2))\mathbf{F}\left(\mathbf{m}_1, \mathbf{m}_2\right)=\left(\|\mathbf{d}\|_2, \angle\left(\mathbf{n}_1, \mathbf{d}\right), \angle\left(\mathbf{n}_2, \mathbf{d}\right), \angle\left(\mathbf{n}_1, \mathbf{n}_2\right)\right) F(m1,m2)=(∥d∥2,∠(n1,d),∠(n2,d),∠(n1,n2))一个点对特征由两点之间的距离、两点的法向Normal夹角,以及两点法线与两点连线的夹角。
在OpenCV的拓展模块和PCL中均有对应的实现,OpenCV相对较坑,对于模型的保存及读取仅保留了对应的接口,并未进行实现,PCL也并未找到相关的模型保存及读取的接口(有找到的可以分享一下哈)
OpenCV代码位置:https://github.com/opencv/opencv_contrib/blob/4.x/modules/surface_matching/src/ppf_match_3d.cpp
PCL代码位置:https://github.com/PointCloudLibrary/pcl/blob/master/features/src/ppf.cpp
//OpenCV中计算PPF代码 ppf_match_3d.cpp 167-180行
void PPF3DDetector::computePPFFeatures(const Vec3d& p1, const Vec3d& n1,const Vec3d& p2, const Vec3d& n2,Vec4d& f)
{Vec3d d(p2 - p1);f[3] = cv::norm(d);if (f[3] <= EPS)return;d *= 1.0 / f[3];f[0] = TAngle3Normalized(n1, d);f[1] = TAngle3Normalized(n2, d);f[2] = TAngle3Normalized(n1, n2);
}//对OpenCV中Train Model过程中对采样后的模型,逐一计算PPF特征 对源码进行部分删减
void PPF3DDetector::trainModel(const Mat &PC)
{for (int i=0; iconst Vec3f p1(sampled.ptr(i));const Vec3f n1(sampled.ptr(i) + 3);for (int j=0; j// cannot compute the ppf with myselfif (i!=j){const Vec3f p2(sampled.ptr(j));const Vec3f n2(sampled.ptr(j) + 3);Vec4d f = Vec4d::all(0);computePPFFeatures(p1, n1, p2, n2, f);}}}
}
PCL代码:
bool
pcl::computePPFPairFeature (const Eigen::Vector4f &p1, const Eigen::Vector4f &n1,const Eigen::Vector4f &p2, const Eigen::Vector4f &n2,float &f1, float &f2, float &f3, float &f4)
{Eigen::Vector4f delta = p2 - p1;delta[3] = 0.0f;// f4 = ||delta||f4 = delta.norm ();delta /= f4;// f1 = n1 dot deltaf1 = n1[0] * delta[0] + n1[1] * delta[1] + n1[2] * delta[2];// f2 = n2 dot deltaf2 = n2[0] * delta[0] + n2[1] * delta[1] + n2[2] * delta[2];// f3 = n1 dot n2f3 = n1[0] * n2[0] + n1[1] * n2[1] + n1[2] * n2[2];return (true);
}
在看完代码后,相信对这个特征提取的流程已经十分熟悉,进行下一步骤。
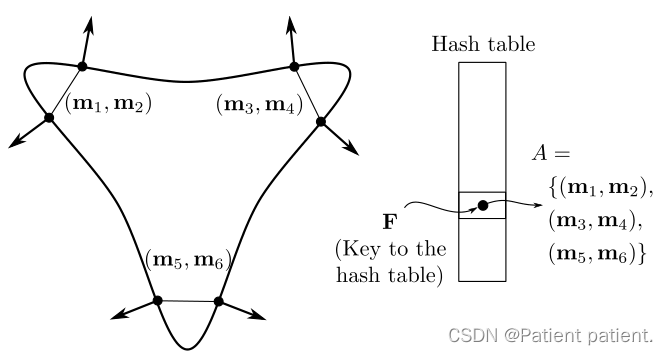
对于模型表面的相似特征点对(m1,m2)\left(\mathbf{m}_1, \mathbf{m}_2\right)(m1,m2),(m3,m4)\left(\mathbf{m}_3, \mathbf{m}_4\right)(m3,m4),(m5,m6)\left(\mathbf{m}_5, \mathbf{m}_6\right)(m5,m6),他们在构建HashTable的过程要投影到同一个位置,避免细小的差异便区别相似特征,采用dangleAngleStep\mathbf{d}_{angle}AngleStepdangleAngleStep和ddistanceDistanceStep\mathbf{d}_{distance}DistanceStepddistanceDistanceStep对PPF特征中的角度和距离进行区间划分,这样,相似的特征在投票的过程便可以落到相同的区域。
//OpenCV中对应代码 AngleStep DistanceStep
static KeyType hashPPF(const Vec4d& f, const double AngleStep, const double DistanceStep)
{Vec4i key((int)(f[0] / AngleStep),(int)(f[1] / AngleStep),(int)(f[2] / AngleStep),(int)(f[3] / DistanceStep));KeyType hashKey[2] = {0, 0};  // hashMurmurx64() fills two valuesmurmurHash(key.val, 4*sizeof(int), 42, &hashKey[0]);return hashKey[0];
}